Sunday, January 31, 2010

Lingerie Secrets "High Cut Pantie"


There is nothing more pathetic than a well-loved pair of ladies underwear (panties, knickers, whatever), which have been worn to the point that the cotton crotch has become a tattered shred, barely even a memory. I could not in all consciousness part with $10 to $12 for a nice pair at Macy's without trying my hand at it, especially since it only takes a half a yard of fabric to make a pair.
For the 2010 Lingerie Contest on PatternReview.com, I chose to make another as yet unreviewed pattern, Lingerie Secrets' "High Cut Pantie". I bought a Value Pack Tricot bundle from Fabric Depot in Garwood, TX (http://www.fabricdepotco.com/ ) at half-price ($15.00) last month. They specialize in fabrics, patterns, and notions for lingerie and active wear. When I got my bundle, a minimum of 10+ yards of solid color fabric, I was delighted with the quality, though I realized I had enough fabric to make all the panties I'll ever need!


I also got a 300 yard spool of elastic. Again, rather overkill, but at $ 0.15/yard, it was a very good deal!


For the thread, I used a very small portion of a 1200 yard spool of YLI Elastic and Bobbin Thread. It seemed to have both strength and a bit of stretchiness to it. This pattern has 3 pattern pieces: front, back, and crotch piece. I used a cotton stretch knit from Spandex World for the lining.


Lingerie Secrets has you sandwich the front piece between the two crotch pieces in a technique similar to that used by Kwik Sew. It is very important to pay attention to wrong and right sides, as when you pull the crotch pieces away from the front after sewing the first seam, you will want the right side of the crotch main or lining pieces to face up on either side.


Here I'm marking the 1/4 inch seam line. I use a water soluble marking pen. Careful, sweaty fingers will remove those marks before you can get the fabric to your machine!


Here I'm "wrapping" the crotch lining around the front of the panty and to the back piece of the panty. After sewing this, you pull the panty pieces through one of the open seams at the side of the crotch. All crotch seams will be concealed.


Here's what it looks like wrapped.


After the crotch is sewn, you attach the elastic to the legs, sew one side, attach the elastic to the waist, sew the remaining side seam, tack down the seams and you are done!


A beautiful pair of panties that look store-bought! And now for some numbers:

fabric---about $1.50
elastic---about $0.37
Thread--about $0.50

So we're talking about $2.37, compared with $10.00 at Macy's.


Oh, and these are incredibly easy to make. I noted the machine tension, needle, and elastic amounts on my pattern instructions. Next time I make this, I think I can do it in an hour.

Sunday, January 10, 2010

Lingerie Secrets "T" Sport Bra


The first PatternReview.com contest of 2010 is the Activewear Contest. I had been wanting to make this "T" Sport Bra from pattern designer Jan Bones, who designs a line of patterns called Lingerie Secrets, for some time and had just the fabric. Her website is located here: http://www.sewinglingerie.com/ .


I bought this spandex fabric from Spandex World in 2008 with the intention of making a bathing suit with it. But when it arrived, I decided I didn't like the sequins and glitter for the pool. It seemed more like dancewear, so I put it aside. I decided this would be just the thing for a non-boring alternative you normally get in the solid color sports bras you buy in the store. So I decided to use this fabric to make my sport bra.


The Lingerie Secrets "T" Sport Bra comes in sizes Small to XLarge and XL1 to XL4, fitting busts from 32" (81 cm.) to 53" (134 cm.). One of the most attractive features of this pattern for me was the separate pattern pieces for bust cup sizes A, B, C, and D, since I always need to do a full bust adjustment on my patterns.

I made the size Large with the D cup pattern piece, to fit a high bust of 36 inches and full bust of 40 inches.

Before cutting the fabric, I tissue-fitted the pattern pieces to myself. What was I thinking?! Of course, it wasn't going to fit. The pattern is paper and the fabric is spandex! Of course, I forgot about that and panicked when it didn't fit. I added 2 inches to the sides and top before cutting it out. And after sewing it up; yeah, yeah, it was too big and no support either. Off came the 2 inches. It fit!

What an incredibly easy pattern to sew! There are only two pattern pieces: a front and a back.


At the sides, the extra fabric is tucked or pleated very attractively. However, Jan states in her instructions, that you may also gather this if you prefer gathers to tucks.


I also decided to underline my sport bra with cotton lycra for more comfort and breathability. Here is a picture of the completed back of the garment, showing the underlining.


And ta-dah! Below are some completed pictures of the front.


And here I am, just back from the gym, wearing it!


Friday, January 1, 2010

2010 Goals for a Great Sewing Year!

1) Sew more! I am shooting for 25 garments (2009 = 15; 2008 = 9).

2) Reduce fabric stash to below 400 yards.

3) Embroidery more with machine.

4) Maintain blog.

5) Enter contests on PR for motivation and inspiration.

6) Take a sewing class/workshop or two!

Monday, December 21, 2009

Simplicity 9143


So about 3 weeks ago DH was looking at sales flyers and pointed out a Mrs. Santa apron.


I didn't like it, but rather than just say no, I told DH that I could make an apron of higher quality. He pointed out that I was lacking in a holiday apron; and boy that got the old cog wheels turning. I remembered all the holiday stash fabric I had and all the adorable apron patterns I had in my pattern stash. I decided to get sewing!


This pattern is a vintage pattern, copyright 1989, that I think I got off eBay last year with a whole slew of others. I love all the different views. They remind me of the many varieties of aprons one sees women wearing in the TV shows of the 1950's. I'm pretty sure my grandma had aprons in at least two of these views as well, and I'm not talking about the standard looking barbecue aprons you see on guys!


I decided I had to make view 3, shown above in the red gingham check with this fabric:


I got this reindeer fabric from Trendy Fabrics last year and hadn't figured out what to do with it yet.


This red polyester lining fabric that I got last year from PR member Petalbaskets is an exact match to the red in my main fabric. But oh how I couldn't get it to cooperate with Mr. Iron! It didn't seem to like Ms. Sewing Machine, either; but when I finally got everything put together, it was lovely!


This pattern called for rickrack, which you can kind of see around the pocket below. Perhaps black rickrack would have made the colors pop more than the matching green I picked.


I left the rick rack off of the neckline area, partially because I was a little worried that it wouldn't feel too good against the back of my neck and mostly because I was too excited with my new apron and pronounced it DONE!


I'm ready to cook! Are you ready for me kitchen?


And another picture of me modeling my oh-so-comfy apron!

Simplicity 4381 --Pajama bottoms


Having successfully made the adorable lobster pj's for younger DS in September, I tried one out for older DS in October and finished them up in early November. I chose Simplicity 4381. These sewed up well. Loved the fly on them and a first for me was piping, which was so-so. I didn't get everything perfectly matched.


Older DS' size falls between a boys size large and a men's size small, per the pattern envelope. My mistake was in picking the men's size small. It would have fit so much better if I had just chosen the boy's size small and graded slightly up for the XL, as the length is much close to DS.
I ended up having to hem the pants at the piping, which minimized its decorative effect. However, older DS has a very nice pair of pj's that can be lengthened for quite some time to come!

Kwik Sew 3042


I finished Kwik Sew 3042, boys' pajama pants bottoms back in September, but didn't get them reviewed in PR till today. Here's my review.


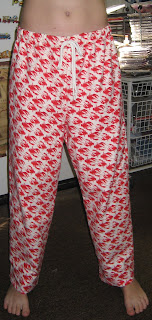
I made these for DS after our trip to NH this summer. We found this adorable lobster print in a warm cotton flannel at JoAnn's and I couldn't resist. Here's our budding model now:


This was a very nice pattern. I particularly enjoyed working with the drawstring elastic, a first for me. I had studied this tutorial (several) times before sewing with it and then had no problems with it.


Because I called these "loungewear" instead of pajamas, DS spent the whole day in them--a Mom's greatest compliment! Here's another picture.

2009 Coming to a close--Accomplishments

Well 2009 is over and I wanted to review my accomplishments for the year and plan for 2010.


Here were the 2009 goals I set for myself:


1) Make 40 garments: Um. How many? Well, last year I made 9. This year, if you count the "Fall in Love With your BabyLock Workship" and the "Anne St. Claire Bra-Making Workshop" I attended, I made 15. Not bad. But maybe 40 is a goal for 2011? I'll try something a bit more manageable this year.


2) Make a complete inventory of stash: Done! Yea!


3) Maintain my blog and learn to use it better: Hummm. Next year will be better.


4) Reduce stash:


5) Enter any motivating contest on PR: Well, I entered the UFO contest and finished 3 of 5 planned projects. Not bad. I'm always pleased to finish a project. I think I entered the stash contest, but can't remember. Obviously I didn't get too far. This year PR has done their contests slightly differently and I've very excited. Moreover, there are just so many that interest me this year.


6) Improve sewing skills: Yes. I feel like each time I make something, I learn something new or become more familiar with my machines, fabric, etc. I'm getting there! I took 2 workshops, see 1 above. I loved the Anne St. Claire bra-making workshop. And since the muslin I made there is practically falling apart, I need to make more! Also loved the BabyLock workshop I went to which was for my new serger, where I made a Christmas holiday tablerunner.


Other:


  • I bought a BabyLock Evolution serger at the October Chantilly Sewing and Quilt Show. LOVE IT!

  • I have an Ellisimo on layaway. Maybe my basement will be in order by June 2010 and I can then go finish paying for it and bring it home.

  • Attended lots of great classes at the Chantilly Sewing and Quilt Show.

  • Have begun using my Janome embroidery machine a bit more this year. Yay! Bought some nice designs to make.

A respectable year? Yes, I think so. Not the great year I planned, but my sewing center was adversely effected by a leaky basement. Finally in October, we decided to have a French drain put in, and there went my sewing center. Now we have a dry, but unfinished basement that is we are slowly redoing with carpet tiles and getting back to normal. But I'm still thinking June '10 before its done.


Ironically, once I no longer had my sewing center, I started sewing again at the dining room table! I guess the unpleasant conditions in my basement were effecting me more than I had thought.